There are a few ways to enable debug mode in Project Zomboid. The first way is to go into the game’s settings menu and enable the “Debug Mode” option. This will give you a variety of options that can be used to debug your game.
The second way is to use the “Enable Debug Mode” button on the main menu. This will also give you access to the same options as the first method, but it will also allow you to see more information about your character and the world around them. Finally, you can use the “Enable Developer Mode” button on the main menu.
This will give you even more options than either of the other two methods, but it should only be used if you know what you’re doing, as it can potentially break your game.
How to Activate Debug Mode in Project Zomboid!
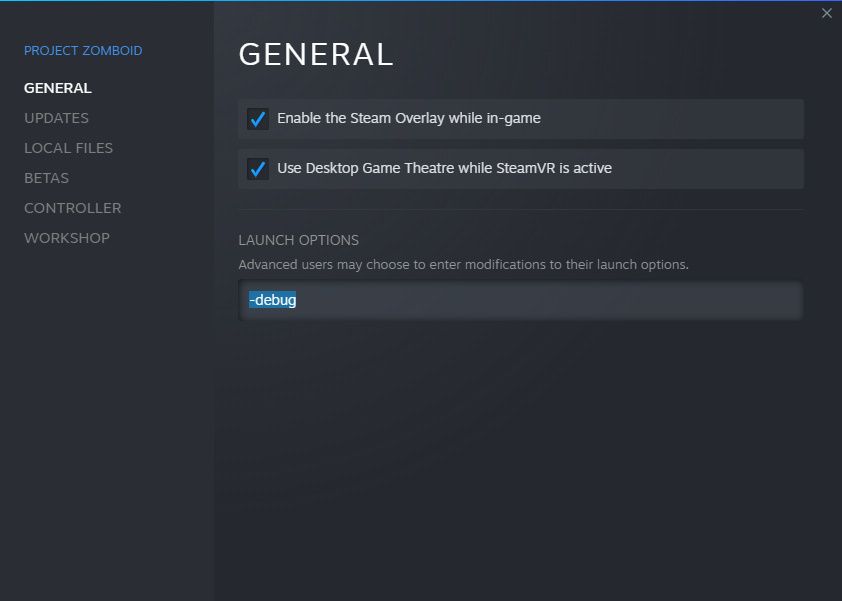
- In the Main Menu, click on the “Configure” button
- In the “Configure” menu, select “Settings”
- In the “Settings” menu, scroll down to the “Debugging” section and check the box next to “Enable Debug Mode”
- Click on the “Save Settings” button at the bottom of the screen
- Restart Project Zomboid for the changes to take effect
Project Zomboid How to Enable Debug Mode Without Steam
If you’re a fan of the indie zombie survival game Project Zomboid, you may know that debug mode is usually only accessible through the Steam version of the game. However, there is a way to enable debug mode without using Steam.
To do this, you’ll need to edit the game’s configuration file.
The file can be found in your Project Zomboid installation folder, under ‘media/scripts/game/main’. Open the file in a text editor and find the line that says ‘EnableDebugMenu 0’. Change the ‘0’ to a ‘1’, then save and close the file.
When you next start up Project Zomboid, debug mode will be enabled. You can access it by pressing F12 while ingame. This gives you access to various cheats and debugging tools, which can be useful if you’re having trouble with the game or just want to experiment.
Just remember that debug mode is intended for use by developers and testers, so use it at your own risk!
Zomboid Debug Mode Multiplayer
Zomboid Debug Mode Multiplayer is a game mode in which players can join forces to survive together against hordes of zombies. In this mode, players have access to a variety of debug tools that they can use to help each other survive. This mode is only available on the PC version of Zomboid.
Players who are interested in playing Zomboid Debug Mode Multiplayer can do so by opening the console and typing “debugmode 1”. This will enable the debug tools for all players in the game. Some of these tools include:
– A map that shows the location of all survivors and zombies in the game world.
– The ability to spawn unlimited items and resources.
– The ability to teleport between locations instantly.
– The ability to turn off zombie AI, making them passive and non-aggressive.
With these powerful tools at their disposal, players will be able to cooperate with each other more easily and stand a better chance against the undead hordes.
Project Zomboid Debug Mode Not Working
If you’re a fan of the zombie survival game Project Zomboid, you may have noticed that the debug mode isn’t working. This can be frustrating if you’re trying to use debug commands to help you in the game. Here’s what you need to know about why debug mode isn’t working and how to fix it.
The reason debug mode isn’t working is because of a recent update to the game. The update changed some of the code that controls debug mode, which means that the commands aren’t being recognized by the game. Fortunately, there is a fix for this problem.
To getdebug mode working again, you need to download and install a mod called “Debug Mode Enabler.” This mod will revert the changes made by the update, allowing you to use debug commands once again. Once you’ve installed the mod, simply press F3 to enter debug mode.
We hope this article has helped clear things up for those of you who were wondering why debug mode wasn’t working. If you have any further questions, feel free to leave a comment below and we’ll do our best to answer them.
Project Zomboid Debug Mode Commands
Project Zomboid is an open world survival horror video game in development by The Indie Stone. It was first released as an alpha version on 30 November 2011, and has been receiving updates since then. The current stable release is Build 41.
The game is set in the fictional town of Muldraugh, Kentucky, in a zombie apocalypse scenario. The player controls one of several survivors, who must scavenge for supplies and build up their base camp while avoiding or fighting zombies. The game features permadeath, meaning that once a character dies, they are permanently dead and cannot be revived.
Debug Mode Commands:
F1 – Toggles debug mode on/off.
F2 – Spawns a human survivor at the cursor location (must have ‘Allow Cheats’ enabled in the options menu).
F3 – Spawns a zombie at the cursor location (must have ‘Allow Cheats’ enabled in the options menu).
F4 – Kills any character or creature under the cursor (must have ‘Allow Cheats’ enabled in the options menu).
F5 – Heals any character or creature under the cursor back to full health (must have ‘Allow Cheats’ enabled in the options menu).
Project Zomboid Debug Mode Teleport
Debug Mode is a mode in Project Zomboid that can be used to test various aspects of the game. It can be enabled by opening the console with the F3 key and typing “debugmode 1”. Once enabled, Debug Mode will give the player access to a variety of commands that can be used to test different features of the game.
One of these commands is “teleport”, which allows the player to instantly teleport to any location in the world.
Teleporting can be useful for testing purposes, or if you simply want to travel around the map quickly. To use the command, simply type “teleport” into the console and then select a destination from the list of locations that appears.
You can also type in a specific coordinates if you know where you want to go. Keep in mind that teleporting will cause your character to become exhausted, so it’s not something that should be done excessively.
If you’re looking for more ways to test out Project Zomboid, then be sure to check out Debug Mode!
It’s a great tool for seeing how different gameplay mechanics work, or for just messin’ around in general.
Project Zomboid Debug Mode Black Screen
Debug mode is a special mode in Project Zomboid that allows players to access certain tools and commands that are not normally available. One of the most useful features of debug mode is the ability to spawn items, which can be very helpful if you’re stuck in a tough situation. However, debug mode can also be problematic, as it can cause your game to crash or freeze.
If you’re experiencing black screen issues in debug mode, there are a few things you can try:
First, make sure you have the latest version of Project Zomboid installed. Debug mode is constantly being updated and improved, so newer versions may fix your issue.
If that doesn’t work, try deleting your “options.ini” file. This will reset all of your settings back to default, which may fix the problem.
Finally, if all else fails, you can always contact the developers directly for help.
They’re usually very responsive and willing to help solve any problems you might be having.
Project Zomboid Debug Mode Gog

What is Project Zomboid Debug Mode?
The debug mode in Project Zomboid is a game mode that allows players to access various tools and features that are normally not available. This mode can be used to test new content, find bugs, and even cheat.
However, it should be noted that using debug mode will disable achievements and progress tracking.
How do I access Debug Mode?
There are two ways to access debug mode: through the main menu or by using console commands.
To access debug mode through the main menu, simply select “Options” and then “Enable Debug Mode”. To use console commands, press the tilde key (~) to open the console and type “debugmode 1” followed by Enter. You can also type “debugmode 0” to disable debug mode.
What features are available in Debug Mode?
Some of the features that are available in debug mode include: spawning items/zombies/npcs, teleporting around the map, increasing/decreasing stats, godmode (invincibility), noclip (ability to walk through walls), etc. Again, using these features will disable achievements so use them at your own risk!
Zomboid Debug Mode Steam
Zomboid Debug Mode Steam is a feature that allows you to view information about your game while it is running. This can be helpful if you are having problems with the game or just want to see how it works. To access debug mode, press the F3 key while in the game.
A new window will appear with various options.

Credit: gamertweak.com
How Do I Activate Debug Mode?
Assuming you would like information on how to debug issues within WordPress:
When developing a WordPress site, there are often times when you need to view PHP errors or other debugging information. By default, WordPress hides these messages from visitors but displays them to administrators (users who are logged in).
If you’re an administrator and not seeing any debug messages, then it’s likely that debug mode is not enabled. In order to enable debug mode, edit your wp-config.php file and look for the following line:
define(‘WP_DEBUG’, false);
Change it to read:
define(‘WP_DEBUG’, true);
Once this change has been made, save the wp-config.php file and upload it back to your server.
Debug mode will now be active and any relevant error messages will be displayed.
How Do I Use Debug Mode in Project Zomboid Without Steam?
Debug mode is a feature in Project Zomboid that allows players to access additional game content and features. This mode can be accessed without Steam by using the following steps:
1. From the main menu, select “Options.”
2. In the options menu, select “Enable Debug Mode.”
3. A message will appear asking if you are sure you want to enable debug mode. Select “Yes” to confirm.
4. Debug mode will now be enabled and you will have access to additional game content and features.
Can I Use Debug Mode in Multiplayer Project Zomboid?
Yes, you can use debug mode in multiplayer Project Zomboid. However, you will need to be the server host in order to do so. When you are the server host, you can enable debug mode by opening the console and typing in “debugmode 1”.
This will enable a number of cheats which can be used to help with testing or troubleshooting. Some of the cheats available in debug mode include: spawning items, teleporting around the map, god mode, and more. Keep in mind that other players on the server will also be able to use these cheats if they know about them, so it’s best only to use them when absolutely necessary.
Is There Console Commands in Project Zomboid?
Project Zomboid is a game with console commands. However, these commands are not well documented and may be subject to change in future versions of the game. That said, here are some basic commands that may be useful:
help – This will bring up a list of all available console commands.
giveitem [item name] – This will give you the specified item. For example, “giveitem water” will give you a water bottle.
spawnmob [mob name] – This will spawn the specified mob. For example, “spawnmob zombie” will spawn a zombie.
Conclusion
In Project Zomboid, debug mode can be enabled by opening the console and typing “debugmode 1”. This will enable a number of features that can be helpful for development and testing purposes. For example, it will allow you to see collision boxes around objects, spawn zombies at will, and give yourself invincibility.
Debug mode is not intended for general use, so be sure to disable it when you’re done using it by typing “debugmode 0” in the console.
- Low-Carb High-Fiber Recipes: The Secret to Eating Well Without the Guilt - July 18, 2025
- Mushroom and Spinach Soup: The Comfort Food Upgrade You Need - July 18, 2025
- How to Get Rosalina in Mario Kart Wii - July 18, 2025